Multi-Layer Viewing
The Multi-Layer Viewing tool makes it easy to compare and analyze multiple map layers side by side. Users can load several layer types into a single view, draw custom zones, and instantly see statistics across multiple polygons and data sources at once. The tool includes PDF report generation where users can print their current map view to a professional report that summarizes all zone statistics in a clean table. The report also includes visualizations of the drawn zones, shown both with and without the underlying map layers for added clarity.
Accessing Multi-Layer Viewing Tool
- In the Main tab, on the Field level, click the "Tools" button from right side panel.
- Select "Multi-Layer Viewing".
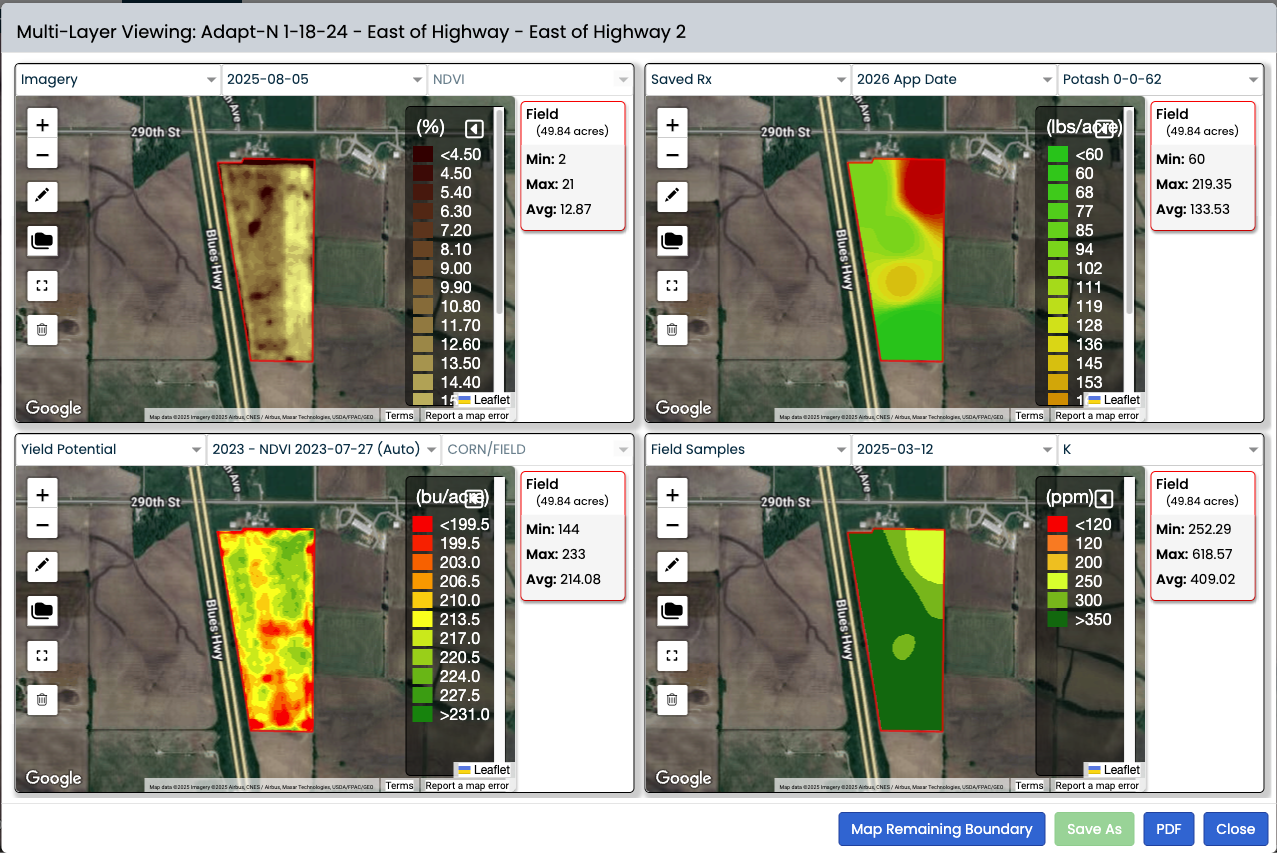
Adding Data to Map Panels
- Four map panels will be presented, and you can load field data to each panel by selecting the layer type, layer name, and the attribute you want to view. You only have to load data to 1 or more panels; you do not have to populate all 4 panels.
- Once a layer is chosen, field level statistics for that layer type will be displayed if numeric data is present.
- A mouse over any one map will duplicate the crosshair on all the other maps and will display any numeric data in the layer.
- If a non-numeric value is chosen, such as As-Planted Product Overview, the product will display but only acres will be summarized for the field.
Layers Available for Viewing
- Elevation
- As-Applied - Product
- Target or Actual
- As-Planted
- Product Overview
- Actual Overview
- Specific Product Actual
- Specific Product Overview
- Normalized Yield
- Yield - Year/Crop
- Elevation
- Moisture
- Speed
- Yield
- Yield Potential
- Field Sample - Date
- Element
- Imagery - Date
- Saved Rx
- Adapt-N
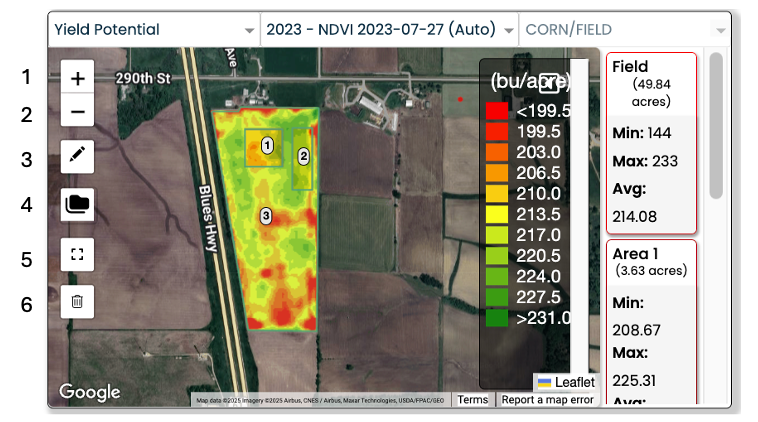
Using Zone Tools
Every map panel has the same set of tools. Zoom in and out will zoom all 4 panels together. The edit tool pencil will bring up another set of tools to draw on the map selected. The open management zone button will bring up the opportunity to load a previously saved management zone from a list. The expand button will expand the current view from which it was selected to fill the entire window. the clear/trash button will immediately clear all drawn polygons and you will lose any work not saved to a management zone.
- Zoom In: Zoom In
- Zoom Out: Zoom Out
- Edit Tool Pencil: Opens up the Polygon, Square, Circle, Vertex Edit, and Control Clear
- Polygon: Creates multi-sided polygon and double clicking to close out the polygon.
- Square: Click once to start the square, move your mouse to size, and click to close it.
- Circle: Click once to start the circle, move your mouse to size, and click to close it.
- Vertex Edit: Click this tool to open up editing. If more than one polygon has been drawn, edit mode opens for all features. Save must be executed on any edit to register.
- Polygon – Move and add vertices to manipulate your polygon
- Square – Click and hold on any vertex to drag in any direction to expand or contract.
- Circle – Clicking any vertex on the circle will allow the user to manipulate the shape of the circle.
- Clear: Once selected the Save, Cancel, and Clear All button will appear. Clicking on any polygon, square, or circle will Clear that single layer from all maps. When finished, hit Save. Cancel will cancel and put the polygon back without saving. Selecting Clear All will remove all polygons from the map and will be final once the Save button is used. Cancel will close the edit and replace the polygons
- Open Management Zone: This tool will allow you to overlay previously created zones onto your map and will also summarize them for each layer.
- Expand Map View: When this button is selected for a map panel the whole panel will expand to take up the whole window. The tool options will remain available, and you can be more precise with your drawing.
- Clear All: This tool will clear all drawn polygons and lets you start with a clean slate. If you saved the layer to a management zone, they can be reloaded. If you have not saved your zones, they will be cleared immediately.

Map Remaining Boundary, Save As, Close
Three buttons appear at the bottom of the Multi-Layer Viewer allowing users to perform additional functions.

- The Map Remaining Boundary will clip/cutout the drawn polygons from the boundary and add the rest of the boundary as a layer in the summary.
- Save As will open a window allowing to you accept the auto-generated name or put in your own name. This will save to the Management Zone folder in the main tree and can be reloaded to the Multi-Layer Viewer.
- PDF will initiate the PDF report to be created. If the zone layer has not been saved you will be prompted to save the layer before the PDF will be created. Results will be saved to the notification center.
- The close button will close the modal and will not ask you to save.